These voice memos can be a critical legal document to prove a case or a music concert that you recorded before, or a class note or an interview you want to send to your colleague. Whatever, these voice memos are so precious, and not to afford to lose it. When you want to replace your iPhone with a new model, or you want to move this recorded voice for legal purposes or to send somebody, then you need a solution to transfer voice memos from iPhone to Computer.
Solutions to Transfer Voice Memos from iPhone to PC
There are three solutions to transfer iPhone memos to a computer. Apple is recommending to connect your iPhone to iTunes and sync your voice memos with PC. Sometimes you won’t be able to see voice memos while you connect iPhone to iTunes and won’t be able to transfer memos between your iPhone and MAC or PC. The second solution here is to use any type of cloud drives like Dropbox or Google drive to transfer voice memos to the computer without iTunes. There is another solution, use the iPhone explorer app to transfer voice memos files from iPhone to the computer without syncing. We mentioned the iPhone explorer application for Windows and MAC in the previous article to explore the iPhone files and to use the iPhone as an external hard disk.
Transfer Voice Memos from iPhone to Computer (WiFi)
Those who want to transfer voice memos from iPhone to Computer without syncing over WiFi, there are a couple of solutions like AirDrop (only for Mac users), Cloud Drives (Dropbox or Google Drive), Message Services (iMessage or WhatsApp), and Email Transfer. The earliest iOS versions were supporting to send iPhone voice memos by email. Now the iOS 7 and above versions support to send voice memos via WiFi by using all the solutions.
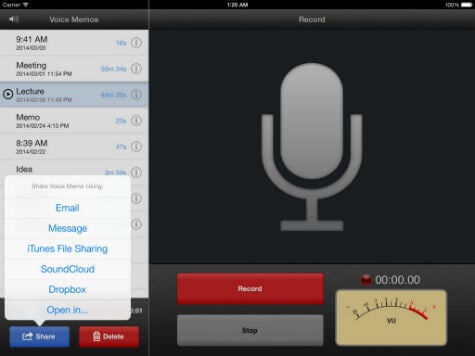
Open the Voice Memo App on your iPhone > Select the voice memo to send > tap on share icon > Select Dropbox or Email. You will see the options to Email or iMessage the memos. If the voice memo is too big, you won’t be able to message it and the better option is to use Cloud Drive or Email. For Mac owners, you can use AirDrop directly to connect between iPhone and Mac to transfer memos instead of using cloud drive or email.
Transfer Voice Memos from iPhone to PC with iTunes.
Apple recommends using iTunes to transfer voice memos to PC. You must download iTunes and install it on your Windows or Mac before you proceed. Once you install iTunes on PC, then connect your iPhone or iPad to your PC which already installed iTunes using the data cable. iTunes will open and prompt you to sync your device with the computer at this moment. You have to be careful with pop-up warnings with iTunes, it may cause to wipe out your entire phone data and sync from the computer.
Now Left click on your iTunes music folder and check voice memos are available to select on the left sidebar of the iTunes window. If not, in the search box in the upper-right type in “Voice Memos”. You should be able to see all of your iPhone voice memos, highlight the ones you want to be copied. Right-click on the required voice memo and select Add to playlist. Finally, pick the playlist to add to and disconnect your iPhone from the PC. The drawback of this solution, you may have to depend on the lightning cable to connect your iPhone to the computer.
Transfer Voice Memos with iPhone Explore App
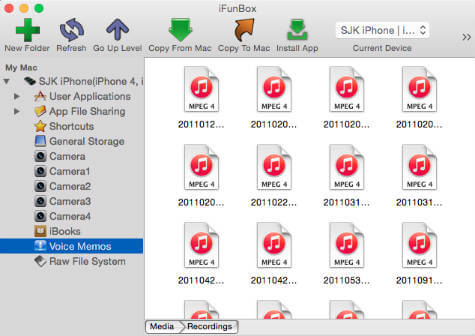
This solution is for the users who would like to depend on the dedicated apps to transfer voice memos from iPhone to the computer. The workaround is to depend iPhone Explore app to explore your iPhone folder and copy or move voice memos from your iPhone directly. iFunBox is an application that allows you to manage files on your iDevice without jailbreaking the device. You can see the folders and files inside your iPhone by simply connecting your device with cable onto your PC. In addition to these, iFunBox will organize and show you applications, books, photos in a tree structure.
You can Import and export songs, videos, photos, and ringtones with iFunBox quick toolbox. When you connect your iPhone or tablet, you will be able to see “Voice Memos” on the left sidebar. Click on voice memos that you require or all of them and click on the icon “Copy to Mac” to make those files from iDevice into your PC. Macgo iPhone Explorer is another free app that you can try to explore your iPhone and manage the files and voice memo.
Record Voice Memos on Cloud with iOS Apps
There are situations like class notes or speech that you want to direct record and transfer automatically to your computer without doing any manual work. There are dedicated iOS apps to record voice memos on the iPhone and transfer to Cloud direct using these apps. These apps are capable of sending your voice memos automatically to any cloud drive once you stop recording. We listed the apps in detail to record iOS Voice Memos Directly into Dropbox or Other Cloud Drives with the help of dedicated apps While considering the easiness and risk factor for losing the data, we would recommend using the first method using File Explore Applications. That is easy to set up, less risk while considering and sync with iTunes.
Δ


